
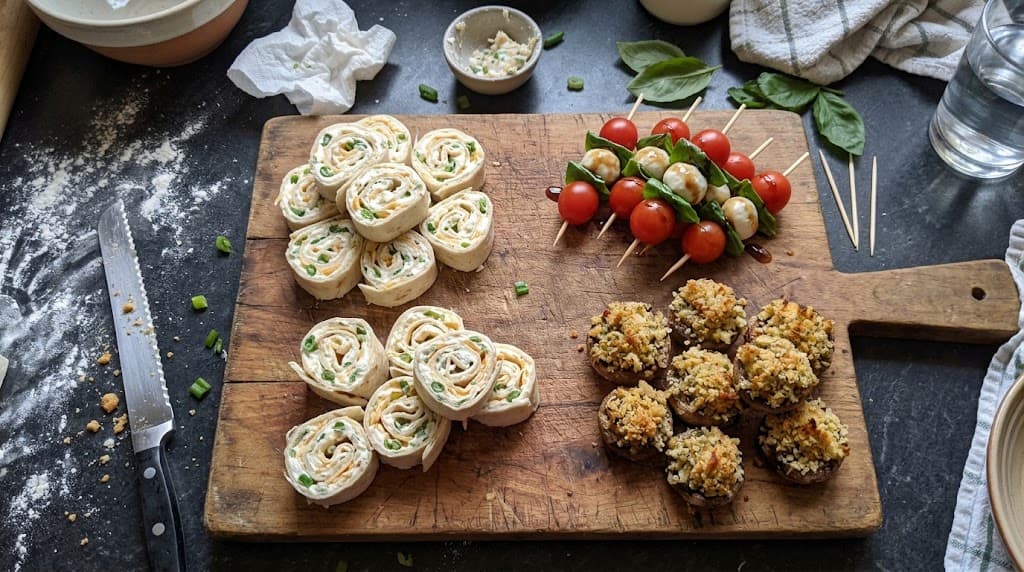
Whenever I host a family gathering or invite friends over, I always remind myself of one golden rule: the host should be enjoying the party, not sweating over a hot stove in the kitchen.
We have all been in that stressful situation where the doorbell rings, unexpected guests arrive, and panic sets in because you have absolutely nothing prepared. Over the years, I have learned that the most impressive snacks aren’t the ones that take three hours or a culinary degree to make. The secret to easy entertaining lies in simple, clever combinations of everyday ingredients.
If you are completely new to cooking, you are in the right place. In this comprehensive guide, I am going to walk you through my foolproof strategy for pulling together quick, stress-free finger foods. Whether you need a simple bite for a weekend movie night or an elegant platter for a holiday party, these five beginner-friendly recipes will make you look like a seasoned chef with minimal effort.
The Stress-Free Guide to Handling Unexpected Guests
Before we dive into the recipes, let’s talk about strategy. When friends or family drop by unannounced, you don’t have the luxury of running to the grocery store. The key is keeping your pantry and fridge stocked with a few versatile basics so you are always ready.
1. The “Emergency” Pantry Staples
To pull off great appetizers at a moment’s notice, always keep these items on hand:
-
Crackers and Baguettes: A good box of water crackers or a simple French baguette can serve as the base for almost anything, from melted cheese to jams.
-
Canned Olives and Artichoke Hearts: Draining a can of olives and tossing them with a little olive oil and oregano instantly creates a fancy, zero-effort snack.
-
Nuts and Honey: Walnuts, pecans, or almonds drizzled with a touch of honey make for a sophisticated addition to any snack table.
2. The Fridge Essentials
-
Cream Cheese: The absolute backbone of easy home appetizers. You can mix cream cheese with almost any herb or spice to create an incredible dip or spread.
-
Flour Tortillas: Perfect for making quick wraps, quesadillas, or our famous party pinwheels (recipe below).
-
Fresh Herbs: A sprinkle of fresh parsley or basil can make a 5-minute snack look like it took hours.
3. The Plating Illusion
Here is a secret from my kitchen to yours: how you serve food matters just as much as what you serve. If you take basic cheese, crackers, and some grapes, but arrange them tightly and beautifully on a large wooden cutting board, it instantly looks like a gourmet charcuterie board. People eat with their eyes first!
5 Foolproof Appetizer Recipes for Beginners
These five recipes are my absolute go-to ideas for any gathering. They require minimal cooking skills, use basic ingredients, and most importantly, they taste incredible.
Recipe 1: The Famous 5-Ingredient Party Pinwheels
If there is one recipe you take away from this guide, let it be this one. These pinwheels are the ultimate crowd-pleaser. They look beautiful on a platter, you can make them ahead of time, and kids love them just as much as adults.
Prep time: 10 mins | Chill time: 1 hour | Total time: 1 hour 10 mins
Ingredients:
-
4 large flour tortillas (burrito size)
-
1 block (8 oz) cream cheese, softened to room temperature
-
1/2 cup sour cream
-
1 cup sharp cheddar cheese, finely shredded
-
1/2 cup green onions, finely chopped
Step-by-Step Instructions:
-
Mix the Base: In a medium-sized mixing bowl, combine the softened cream cheese and sour cream. Use a spatula to mix them until they are completely smooth. If your cream cheese is too cold, microwave it for just 10 seconds.
-
Add the Flavor: Fold in the shredded cheddar cheese and chopped green onions. Stir until everything is evenly distributed.
-
Spread the Mixture: Lay your tortillas flat on a clean cutting board. Scoop a generous amount of the cream cheese mixture onto each tortilla and spread it evenly, going almost all the way to the edges.
-
Roll Tightly: Starting at one end, roll the tortilla up as tightly as you can. A tight roll ensures your pinwheels won’t fall apart when you cut them.
-
Chill (Crucial Step!): Wrap the rolled tortillas in plastic wrap and place them in the fridge for at least 1 hour. This firms up the cream cheese and makes slicing a breeze.
-
Slice and Serve: Remove from the fridge, unwrap, and use a serrated knife to cut the rolls into 1-inch thick slices.
Recipe 2: Quick Caprese Skewers with Balsamic Glaze
When you need a quick idea during the warmer months, these Caprese skewers are a lifesaver. They require absolutely zero cooking, look incredibly elegant, and bring a fresh, vibrant pop of color to your table.
Prep time: 10 mins | Cook time: 0 mins | Total time: 10 mins
Ingredients:
-
1 pint cherry tomatoes (or grape tomatoes)
-
1 tub (8 oz) fresh mozzarella balls (bocconcini)
-
1 bunch fresh basil leaves
-
2 tablespoons extra virgin olive oil
-
Salt and black pepper to taste
-
Store-bought balsamic glaze
Step-by-Step Instructions:
-
Wash and Prep: Rinse your cherry tomatoes and fresh basil leaves thoroughly. Pat them dry with a paper towel. Extra moisture is the enemy of a good Caprese salad!
-
Assemble the Skewers: Grab a small wooden toothpick or appetizer skewer. Thread one cherry tomato, fold one basil leaf in half and thread it on, followed by one mozzarella ball.
-
Arrange: Place the finished skewers on a bright white platter to make the red, green, and white colors stand out.
-
Season: Lightly drizzle the skewers with high-quality olive oil. Sprinkle with a pinch of sea salt and freshly cracked black pepper.
-
The Finishing Touch: Right before serving, drizzle the balsamic glaze in a zig-zag pattern over the entire platter.
Expert Tip: Do not put the balsamic glaze on until the very last second. If it sits too long, the acid in the vinegar will cause the fresh basil leaves to turn brown and wilt.
Recipe 3: 10-Minute Garlic Parmesan Stuffed Mushrooms
Stuffed mushrooms sound fancy, which makes people think they are difficult to make. But they are actually one of the easiest warm snacks you can create. They are comforting, savory, and perfect for evening guests.
Prep time: 10 mins | Cook time: 15 mins | Total time: 25 mins
Ingredients:
-
1 lb whole white or cremini mushrooms, cleaned
-
3 cloves garlic, minced
-
1/4 cup butter, melted
-
1/2 cup Italian breadcrumbs
-
1/3 cup grated Parmesan cheese
-
2 tablespoons fresh parsley, chopped
-
Salt and pepper to taste
Step-by-Step Instructions:
-
Prep the Mushrooms: Preheat your oven to 400°F (200°C). Wipe the mushrooms clean with a damp paper towel (never soak mushrooms in water, or they will absorb it and become soggy). Carefully snap the stems out of the mushroom caps.
-
Make the Filling: In a small bowl, combine the melted butter, minced garlic, breadcrumbs, Parmesan cheese, parsley, salt, and pepper. Stir until the mixture looks like wet sand.
-
Stuff the Caps: Place the mushroom caps hollow-side up on a baking sheet lined with parchment paper. Use a small spoon to scoop the breadcrumb mixture into each mushroom cap. Press down slightly so the filling stays in place.
-
Bake: Bake for 15 to 18 minutes. You will know they are done when the mushrooms are tender and the breadcrumb topping is a beautiful golden brown.
-
Serve: Let them cool for about 3 minutes before serving—the insides get very hot and you don’t want your guests burning their mouths!
Recipe 4: Crispy Baked Zucchini Bites with Garlic Yogurt Dip
If you want to offer a slightly lighter option that still feels like comfort food, these zucchini bites are perfect. They sneak some vegetables onto the party table but are so crispy and flavorful that everyone will be asking for the recipe.
Prep time: 15 mins | Cook time: 20 mins | Total time: 35 mins
Ingredients for Zucchini Bites:
-
2 medium zucchinis, sliced into 1/4-inch thick rounds
-
1/2 cup Panko breadcrumbs
-
1/4 cup grated Parmesan cheese
-
1/2 teaspoon garlic powder
-
1 egg, beaten
Ingredients for the Dip:
-
1/2 cup plain Greek yogurt
-
1 clove garlic, minced
-
1 tablespoon lemon juice
-
Pinch of salt
Step-by-Step Instructions:
-
Oven Prep: Preheat your oven to 425°F (220°C). Place a wire cooling rack on top of a baking sheet and spray it lightly with non-stick cooking spray. Using a wire rack ensures the hot air circulates and both sides of the zucchini get crispy without needing to flip them.
-
The Breading Station: In a shallow dish, mix the Panko breadcrumbs, Parmesan cheese, and garlic powder. In a separate small bowl, beat the egg.
-
Coat the Zucchini: Dip each zucchini slice into the beaten egg, shaking off any excess. Then, press it firmly into the breadcrumb mixture so both sides are heavily coated. Place the coated slice onto the wire rack.
-
Bake: Bake for 15-20 minutes, or until the breadcrumbs are golden and crispy.
-
Make the Dip: While the zucchini is baking in the oven, stir together the Greek yogurt, minced garlic, lemon juice, and salt in a small bowl.
-
Serve: Serve the crispy zucchini bites warm alongside the cool, tangy garlic yogurt dip.
Recipe 5: Sweet & Savory Brie and Jam Crostini
This is my absolute favorite “emergency” recipe. It uses only three ingredients but looks and tastes like it came from a high-end catering company. The combination of melted cheese and sweet jam is irresistible.
Prep time: 5 mins | Cook time: 5 mins | Total time: 10 mins
Ingredients:
-
1 French baguette, sliced into thin rounds
-
1 wheel of Brie cheese
-
1/2 cup of your favorite fruit jam (fig, raspberry, or apricot work best)
-
(Optional) Fresh thyme leaves for garnish
Step-by-Step Instructions:
-
Toast the Bread: Arrange the baguette slices on a baking sheet. Broil them in the oven for 1-2 minutes until they are slightly toasted. Keep a very close eye on them so they don’t burn!
-
Prep the Cheese: Cut the Brie cheese into small, thin slices. (Pro tip: Brie is very soft and sticky. It is much easier to cut cleanly if you pop it in the freezer for 15 minutes before slicing).
-
Assemble: Place a slice of Brie on top of each toasted baguette slice.
-
Melt: Put the baking sheet back in the oven for about 2-3 minutes, just until the Brie starts to soften and melt over the edges of the bread.
-
Add the Sweetness: Remove from the oven and immediately top each warm crostini with a small half-teaspoon dollop of jam.
-
Garnish: If you have fresh thyme, sprinkle a few leaves on top for a beautiful pop of green and a sophisticated earthy flavor.
Frequently Asked Questions About Party Prep
To make your hosting experience even smoother, here are a few common questions I get from readers about planning their snack tables:
How many appetizers should I plan per person? If you are serving a full dinner later in the evening, aim for 3 to 4 appetizer pieces per person. If you are hosting an “appetizers only” cocktail party, you need to plan for 8 to 10 pieces per person to ensure no one goes home hungry.
How far in advance can I make these? Cold items, like the Party Pinwheels and Caprese Skewers, can generally be prepped 12 to 24 hours in advance if kept tightly sealed in the fridge. Hot items, like the Stuffed Mushrooms or Zucchini Bites, are best assembled ahead of time but baked right before guests arrive so they stay warm and crispy.
What is the cheapest option to make for a large crowd? Pinwheels and crostini are incredibly budget-friendly. A single baguette and a few simple toppings can feed a dozen people easily without breaking the bank.
Final Thoughts
Hosting a gathering shouldn’t feel like a chore. By keeping things simple and relying on foolproof recipes, you can spend less time stressing over complicated cooking techniques and more time actually enjoying the company of your friends and family.
Have you tried any of these recipes for your family gatherings? Let me know in the comments below which one was your favorite, or share your own emergency hosting tips!

Olivia Dawson is a food writer and recipe developer focused on creating clear, practical, and family-friendly cooking content. She specializes in approachable recipes made with everyday ingredients and well-explained methods that support confident cooking. Through Recipes With Olivia, Olivia shares thoughtfully crafted meal ideas designed to be reliable, enjoyable, and easy to recreate in everyday kitchens.