
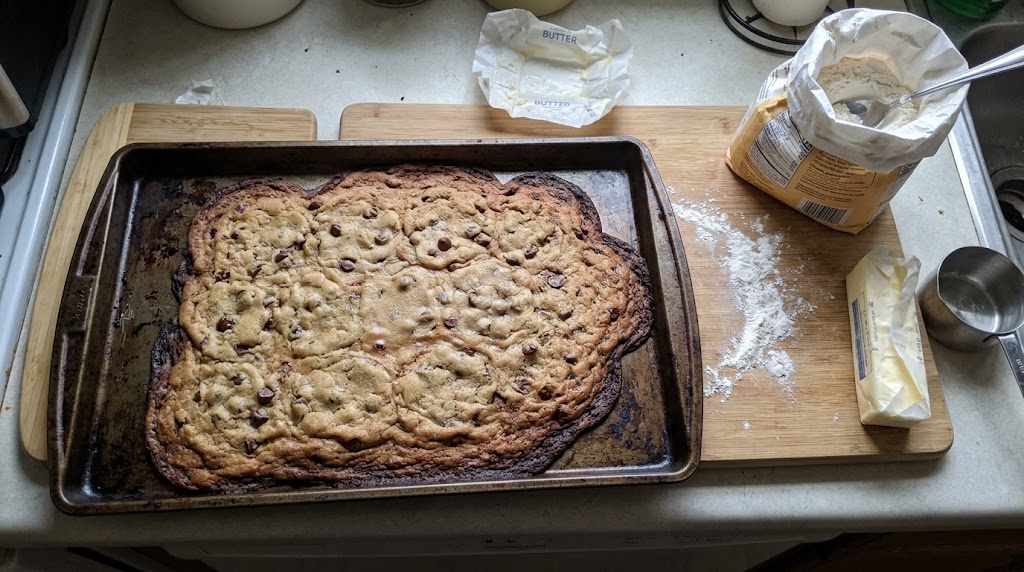
We have all experienced that highly specific, crushing kitchen heartbreak. You spend a lazy Sunday afternoon meticulously measuring flour, creaming butter and sugar, folding in expensive chocolate chips, and anticipating that perfect, bakery-style cookie. Your kitchen smells like an absolute dream. You place those perfectly rolled little spheres of dough onto the baking sheet, slide them into the oven, and confidently set your timer.
But when that timer goes off and you open the door, the dream shatters. Instead of thick, chewy, beautifully domed cookies, you are staring at a massive, greasy, paper-thin puddle of dough that has aggressively spread across the entire baking sheet. The edges are crispy and burnt, the center is raw, and your beautiful individual cookies have fused together into a single, flat mega-cookie.
If you have ever experienced this baking tragedy, take a deep breath. You are not alone, and it does not mean you are a bad baker. It is perhaps the most common frustration I hear from home cooks. Baking, unlike throwing together a soup or a stir-fry, is an exact science. It relies on a highly delicate balance of fat, flour, temperature, and time. When just one of these elements is slightly off, the entire chemical reaction inside the oven changes drastically.
The good news is that the culprits behind flat cookies are incredibly common, easy to identify, and even easier to fix. In this comprehensive baking guide, we are going to dive deep into the exact reasons your cookie dough is melting into a puddle, the kitchen science behind how cookies hold their shape, and the professional techniques you can use to bake thick, chewy, perfect cookies every single time.
The Kitchen Science of a Baking Cookie
To stop your cookies from spreading, you first need to understand what actually happens when a cold ball of dough enters a 350-degree oven. It is a rapid, fascinating chemical process.
When you put cookie dough into the hot oven, the butter (the fat) inside the dough immediately starts to heat up and melt. As the butter melts, the dough begins to spread outward and flatten. At the exact same time, the intense heat of the oven is working to evaporate the liquids, activate the baking soda to create a lift, and set the structural proteins of the flour and eggs.
Baking a cookie is essentially a high-stakes race. It is a race between the butter melting (which causes spreading) and the flour/egg structure setting (which stops the spreading).
If the butter melts significantly faster than the structure can set, the cookie will spread out into a flat, greasy puddle long before the edges have a chance to firm up. Every single tip in this guide revolves around one core goal: slowing down the melting fat while speeding up the setting of the structure.
Culprit 1: The Butter Was Simply Too Warm
If I had to guess why your last batch of cookies spread too much, I would bet my favorite mixing bowl that it had to do with the temperature of your butter. This is the absolute number one reason home bakers end up with flat cookies.
Most traditional cookie recipes start with the exact same instruction: Cream the butter and sugar. Butter should be at room temperature.
The problem lies in how we interpret the phrase “room temperature.” Many people leave their butter out on the kitchen counter all day long, or worse, they microwave it for ten seconds to soften it up quickly. If your butter is shiny, greasy, or actively melting around the bottom edges before you even start mixing it with sugar, it is already far too warm.
When butter is too warm going into the mixer, it loses its structural integrity. It cannot hold the tiny air pockets necessary during the creaming process. Even worse, because it is already halfway to a liquid state, the moment it hits the hot oven, it immediately turns into hot oil. The dough collapses and spreads outward before the flour has any time to bake and hold the cookie together.
The Ripe Peach Touch Test How do you know if your butter is the perfect temperature for baking? Use the touch test. Properly softened butter should feel like a ripe peach. It should be slightly cool to the touch, and when you press it firmly with your finger, it should yield slightly and leave an indent, but it should never feel greasy, mushy, or warm. It usually only takes about 45 to 60 minutes on the counter to reach this ideal state.
Culprit 2: The Measuring Cup Trap (Not Enough Flour)
Flour provides the vital structural backbone of your cookie. It acts as the scaffolding that holds the melting fat in place while it bakes. If you do not have enough flour in your dough, the butter has nothing to bind to, and the cookie simply melts away into nothingness.
You might be thinking, “But I followed the recipe exactly! I used exactly two and a quarter cups of flour!”
Unfortunately, the way we measure flour in standard home kitchens is deeply flawed. Most people take their measuring cup, plunge it directly into the heavy bag of flour, and scoop it out. This is known as the “scoop and sweep” method, and it is a recipe for dense, inaccurate baking. When you push a measuring cup into a bag of flour, you are densely packing the powder into the cup. A single cup of scooped flour can weigh up to 30% more (or 30% less) than the recipe author actually intended.
The Solution: The Spoon and Level Method If you do not own a digital kitchen scale (which is by far the absolute best way to measure baking ingredients), you must change how you use your measuring cups.
Take a standard spoon and fluff up the flour inside your container to aerate it. Then, gently spoon the flour into your measuring cup until it forms a small, snowy mountain over the top. Finally, take the straight back edge of a butter knife and scrape it across the top of the measuring cup to level it off perfectly. This ensures you are getting light, aerated flour, giving your cookies the exact amount of structure they need to stand tall in the oven.
Culprit 3: Putting Raw Dough on a Hot Baking Sheet
This is a highly sneaky mistake that often ruins the second or third batch of cookies, even if the very first batch came out looking like a magazine cover.
When you are baking multiple batches of cookies for a party, you usually take the first batch out of the oven, quickly transfer the hot cookies to a wire cooling rack, and immediately drop the next round of raw cookie dough onto that exact same hot baking sheet.
Think back to the science of the cookie we discussed earlier. If you put raw dough onto a metal pan that is already radiating 300 degrees of heat, the butter inside the dough will begin melting aggressively before the pan even goes back into the oven. The race has already been lost. The dough spreads out prematurely, resulting in flat, thin, sad cookies.
Never put raw dough on a warm baking sheet. If you only own one baking sheet, you must let it cool down completely between batches. To speed up the process, you can run the back of the metal pan under cold tap water for a few seconds and dry it thoroughly with a towel before dropping your next round of dough.
Culprit 4: Your Oven is Lying to You
We inherently trust our kitchen appliances, assuming that when we set the oven to 350°F (175°C), it is actually heating to that exact temperature. The reality is that most home ovens are incredibly inaccurate and poorly calibrated. An oven can easily run 15 to 25 degrees hotter or colder than the digital dial indicates.
If your oven is running too cold, it spells absolute disaster for cookies.
If the oven temperature is too low, the dough sits in a warm environment rather than a hot one. The butter melts slowly, spreading outward continuously, but the heat isn’t intense enough to rapidly bake the flour and set the protein structure. The cookie spreads and spreads until the edges finally start to bake and harden.
The only way to truly know what is happening inside your oven is to purchase an inexpensive, stainless steel oven thermometer. You hang it directly on the middle baking rack. You might be shocked to discover that when your oven chimes to say it has preheated to 350°F, it is actually only sitting at 320°F. Always bake by the analog thermometer inside the oven, not the digital readout on the front panel.
Culprit 5: Expired Leavening Agents
Baking soda and baking powder are the chemical leavening agents responsible for making your cookies rise, puff up, and look appealing. They react with the heat of the oven and the acidity in the dough to create tiny carbon dioxide gas bubbles that physically lift the heavy dough.
These crucial ingredients do not last forever. If that little orange box of baking soda has been sitting open in the back of your pantry for two years, it has completely lost its chemical potency. Without that crucial lift, the cookies will remain dense and spread outward instead of puffing upward.
Before you start a massive baking project, test your ingredients. To test baking soda, drop a half-teaspoon into a small bowl and pour a splash of white vinegar over it. It should fizz and bubble aggressively and immediately. To test baking powder, drop a half-teaspoon into a bowl of hot water; it should also bubble up vigorously. If either powder just sits there looking cloudy and lifeless, throw it away and buy fresh boxes immediately.
The Ultimate Foolproof Fix: Chilling the Dough
If you have measured your flour perfectly, used cool butter, checked your oven temperature, and you still want thicker, chewier, more professional-looking bakery cookies, there is one technique that changes absolutely everything: Chilling the dough.
Almost every professional baker chills their cookie dough in the refrigerator for anywhere from two hours to an entire 24 hours before baking. This step is a monumental game-changer for two vital reasons:
- It solidifies the fat: Chilling the dough takes that soft, creamed butter and turns it back into a rock-hard cold solid. When you put a cold, hard ball of dough into a hot oven, it takes significantly longer for the butter to melt. This gives the flour plenty of time to bake and set its structure firmly before the cookie has a chance to spread outward.
- It hydrates the flour: As the dough sits resting in the fridge, the flour slowly absorbs the moisture from the eggs and the butter. This dries out the dough slightly, making it firmer and more robust, which further prevents spreading. It also concentrates the flavors, resulting in a richer, deeper, caramel-like taste that you simply cannot get from freshly mixed dough.
Even if your specific recipe does not explicitly call for chilling, try covering your mixing bowl with plastic wrap and letting it rest in the fridge for just one hour. The difference in the height, texture, and flavor of the final cookie will astound you.
How to Save a Spreading Batch Mid-Bake
Let’s say you are reading this article in a panic because you just looked through the oven window and your cookies are actively spreading into a puddle right now. Can you save them? Yes!
Grab a large metal spoon or a round biscuit cutter that is slightly larger than the cookie. Open the oven door, and working very quickly, use the spoon to gently push the spread-out edges of the half-baked cookies back toward the center. This physically forces the hot cookie to become thicker and perfectly round. Close the door and let them finish baking.
Once you pull that first rescued batch out, take all the remaining raw dough that is sitting on your counter and put it straight into the refrigerator or freezer for 20 minutes before baking the next round.
Final Thoughts on Better Baking
Baking is a lifelong journey of trial and error, and a flat batch of cookies is almost a rite of passage for every home baker. Do not let one baking failure discourage you from getting back into the kitchen and trying again.
By taking the time to ensure your butter is slightly cool to the touch, measuring your flour accurately with a spoon, keeping your baking sheets cool between rounds, and embracing the absolute magic of chilling your dough, you will take complete control over your oven. You will never have to scrape a massive, flat cookie puddle off a baking pan ever again.

Olivia Dawson is a food writer and recipe developer focused on creating clear, practical, and family-friendly cooking content. She specializes in approachable recipes made with everyday ingredients and well-explained methods that support confident cooking. Through Recipes With Olivia, Olivia shares thoughtfully crafted meal ideas designed to be reliable, enjoyable, and easy to recreate in everyday kitchens.